-- Drop all tables based on a specific name
-- Currently set to drop all tables starting with z
-- This likely won't work for tables that have foreign keys...
DECLARE @TABLE_NAME varchar(255)
declare @SQL varchar(255)
DECLARE CUR CURSOR FOR
SELECT TABLE_NAME
FROM INFORMATION_SCHEMA.TABLES
WHERE TABLE_TYPE = 'BASE TABLE' AND TABLE_CATALOG='YourDatabaseName'
and TABLE_NAME like 'z%'
order by TABLE_NAME
OPEN CUR
FETCH NEXT FROM CUR INTO @TABLE_NAME
WHILE @@FETCH_STATUS = 0
BEGIN
SET @SQL = 'drop table if exists ['+@TABLE_NAME + ']'
PRINT @SQL
--EXEC (@SQL) -- uncomment this line to actually delete your tables
FETCH NEXT FROM CUR INTO @TABLE_NAME
END
CLOSE CUR
DEALLOCATE CUR
Code By Joshua the Lionhearted
This is where I blog mostly for my own benefit, so I can remember some of the programming and IT stuff that I have worked on in the past.
Thursday, November 3, 2016
Drop SQL tables based on table name
Here is a little SQL snippet for Microsoft SQL Server to drop (delete) tables based on their name. I have the custom of prefixing all old tables I don't use with a Z, so they drop to the bottom of the list. I finally wanted to delete them all, so here is a nice script that accomplished that. You must specify the specific database by changing 'YourDatabaseName.'
Monday, August 10, 2015
A MS Word Macro for Auto Footer Generation
Here is a Microsoft Word macro that I worked up for a situation where I was trying to print a large number of .rtf files that didn't have any footer, but I wanted a footer that contained the filename, the print date and time, and the current page (of the total pages). It should work for printing other types of files, such as .doc, .docx, .txt, or possibly whatever you can open with word.
In my case, I didn't want to save the footer, so I wrote a second macro that calls the first one, to print the file and exit without saving the file.
Sub GenerateFooterAndInfo()
'
'
If ActiveWindow.View.SplitSpecial <> wdPaneNone Then
ActiveWindow.Panes(2).Close
End If
If ActiveWindow.ActivePane.View.Type = wdNormalView Or ActiveWindow. _
ActivePane.View.Type = wdOutlineView Then
ActiveWindow.ActivePane.View.Type = wdPrintView
End If
ActiveWindow.ActivePane.View.SeekView = wdSeekCurrentPageFooter
'add filename to left side of footer
Selection.Fields.Add Range:=Selection.Range, Type:=wdFieldEmpty, Text:= _
"FILENAME ", PreserveFormatting:=True
Selection.TypeText Text:=vbTab
'add date to center of footer
Selection.InsertDateTime DateTimeFormat:="M/d/yyyy h:mm:ss am/pm", _
InsertAsField:=True, DateLanguage:=wdEnglishUS, CalendarType:= _
wdCalendarWestern, InsertAsFullWidth:=False
Selection.TypeText Text:=vbTab
'add page of pagecount to right side of footer
Selection.TypeText Text:="Page "
Selection.Fields.Add Range:=Selection.Range, Type:=wdFieldEmpty, Text:= _
"PAGE ", PreserveFormatting:=True
Selection.TypeText Text:=" of "
Selection.Fields.Add Range:=Selection.Range, Type:=wdFieldEmpty, Text:= _
"NUMPAGES ", PreserveFormatting:=True
ActiveWindow.ActivePane.View.SeekView = wdSeekMainDocument
End Sub
And here is the second macro that avoids saving the changes:
Sub CreateTempFooterThenPrintAndExit()
'
'
GenerateFooterAndInfo
ActiveDocument.PrintOut
'close document without saving autogenerated footer
ActiveWindow.Close (False)
Application.Quit
End Sub
These macros make it easy to open a file and immediately print it, without changing the file, and yet having the information about the file easily at hand. These could be easily modified to print the path to the filename, etc. for either headers or footers in Word documents.
Hope this helps someone out there.
Tuesday, April 14, 2015
Add a TAB character to a Microsoft Access column directly
I was trying to add a tab character directly into a column in Microsoft Access in the same way ALT+CODE works for other types of characters. For example, ALT+0169 produces the Copyright symbol (©) just fine. But not for TAB, and probably other standard ASCII non-printable characters less than 128...
So...
Open Notepad and enter a tab, COPY it, and go to your cell in Microsoft Access, and add the tab wherever you want it.
You won't be able to see it though...
But not to worry, just copy the whole cell, and then past it back into Notepad and you will see it show up.
Not sure why you may want a tab in your data, but if you do, this will work...
I was using SQL Server 2005 and Access 2013 for this
Clean Every SQL Table Column of Unwanted Data
Here is a simple T-SQL snippet for Microsoft SQL Server 2005 (and probably other editions) that you can use to clean up the strings in the columns of your table by removing extra spaces, tabs, carriage returns, and newlines. This is useful when you have imported data from somewhere and need to do some cleaning on it...
/***************************************************************
DESCRIPTION: This TSQL Code snippet will perform data cleaning on every varchar
column and nvarchar column in the specified table, except for varchar(max) and
nvarchar(max) columns.
PURPOSE: This is useful for removing extra spaces, tabs, carriage returns, new lines, and
trimming the front and end of the strings in all your columns. Add other cleaning
routines if you would like, or combine multiple cleaning activities in one statement.
WARNING: DATA LOSS WILL LIKELY RESULT
Every [n]varchar column with a length less than max will be affected.
RECOMMENDED: Test on a COPY of the desired table before use to determine data loss.
***************************************************************/
declare @sql as varchar(2000)
declare @Table as varchar(250)
declare @Column as varchar(250)
declare @Count as int
declare @x as int
set @Table = 'Authors' -- ENTER YOUR TABLE NAME HERE
set @Column = ''
set @Count = 0
set @x = 1
-- delete the temp table if it exists
IF OBJECT_ID(N'tempdb..#aTempTable') IS NOT NULL drop table #aTempTable
-- get valid column names in a temp table
SELECT
row_number() over (order by ordinal_position) as ROW
,COLUMN_NAME
into #aTempTable
FROM INFORMATION_SCHEMA.COLUMNS
WHERE
data_type like '%varchar' /* find all varchar and nvarchar columns */
and table_name like @Table
and character_maximum_length > 0 /* avoid varchar(max) columns which are -1 character_maximum_length */
-- how many columns are in the table?
set @Count = (select max(row) from #aTempTable)
while @x <= @Count -- Loop through the column names, and perform data cleaning
begin
-- get the column name for this iteration
set @Column = (select column_name from #aTempTable where row = @x)
-- notify user what is happening (on the messages tab in SQL Server Managment Studio)
print ''
print ''
print cast(@x as varchar(20)) + '. Cleaning ' + @Column
-- perform various data cleaning activities on each column of the data in a given table
-- replace tabs, carriage returns, and newlines with spaces
set @sql = 'update ' + @Table + ' set [' + @Column + '] = replace(replace(replace([' + @Column +'],char(10),'' ''), char(13), '' ''),char(9),'' '')'
--select (@sql)
exec (@sql)
-- replace two spaces with one
set @sql = 'update ' + @Table + ' set [' + @Column + '] = replace(replace([' + @Column +'],'' '','' ''), '' '', '' '')'
--select (@sql)
exec (@sql)
-- trim everything, removing beginning and trailing spaces
set @sql = 'update ' + @Table + ' set [' + @Column + '] = ltrim(rtrim([' + @Column +']))'
--select (@sql)
exec (@sql)
-- add your specialized cleaning code here...
-- go to next column name
set @x = @x + 1
end
drop table #aTempTable
go
/* Sample Output -- that would be run by the exec (@sql) statements
update Author set [AuthorName] = replace(replace([AuthorName],char(10),' '), char(13), ' ')
*/
Tuesday, February 25, 2014
Add the column Description property to the table designer view in SQL Server Management Studio 2012
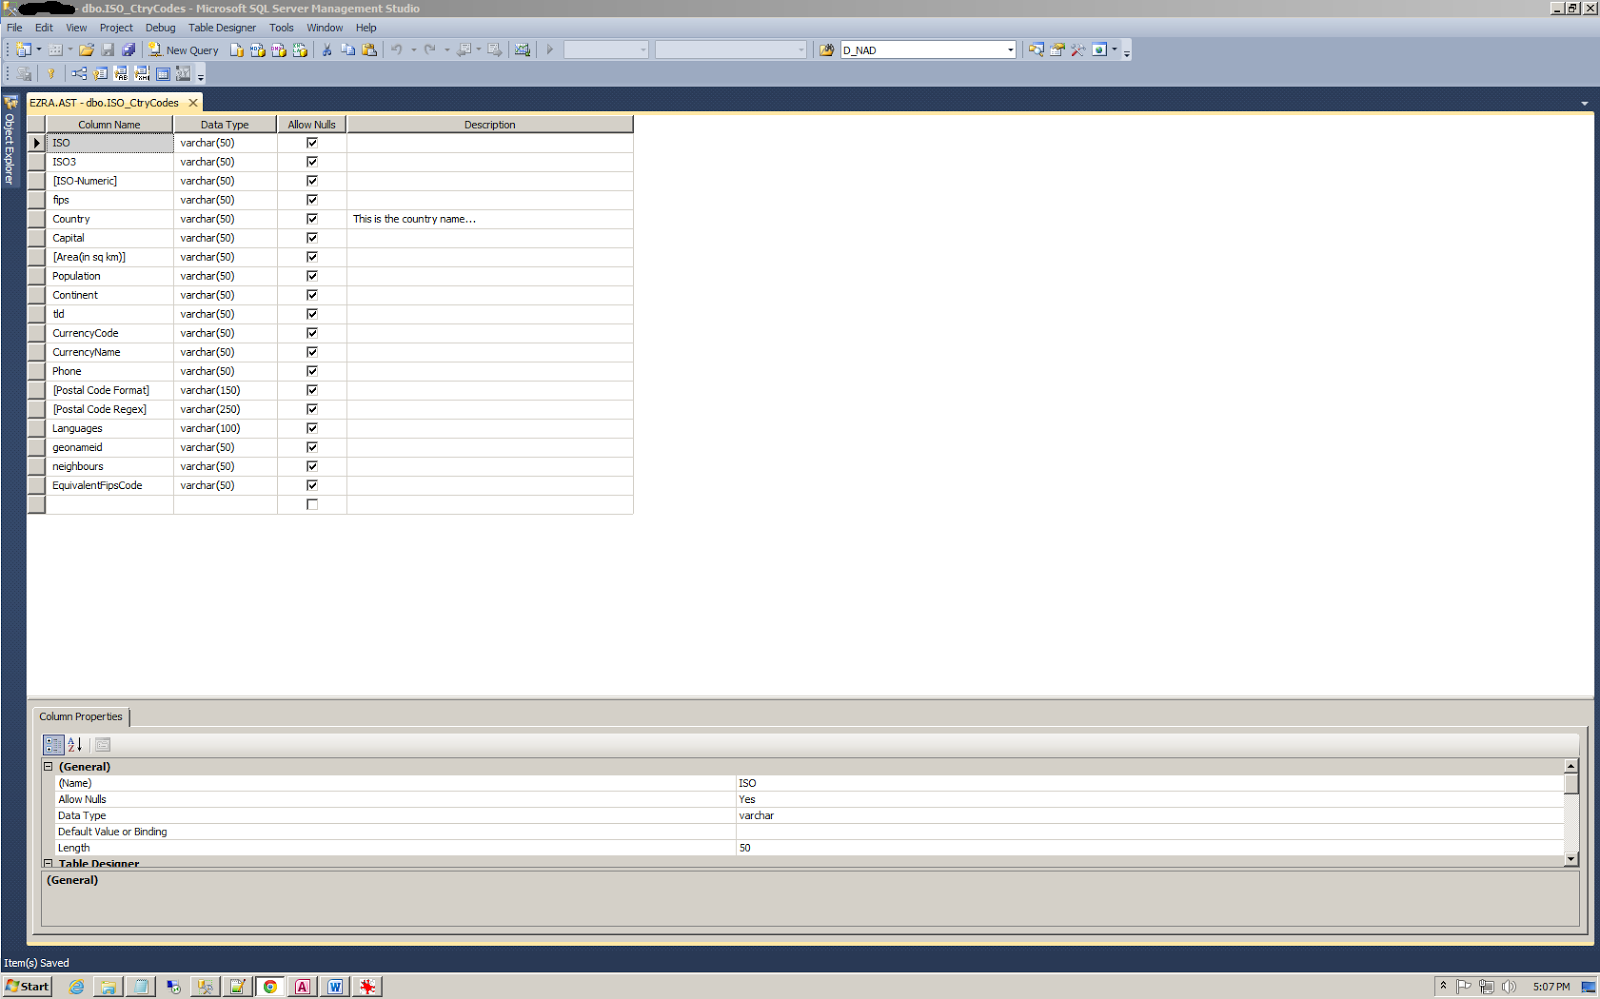
Wouldn't it be nice to see the column Description property right beside the Allow Nulls column for the columns in your table? This seems like a no-brainer, but it is not that easy to do in SQL Server Management Studio (SSMS). Unfortunately, you have to edit the registry. But if you do it correctly (be careful), you can take your table designer view from looking like this:
SQL Server Management Studio before Description property is added...
to this:
SQL Server Management Studio after Description property is added...
This looks so much more useful!
Follow these instructions for how to do this for SQL Server Management Studio 2012. See the bottom for a link that should work for older versions of SSMS.
USE CAUTION BELOW.
REGEDIT, if not used correctly, can really mess up your computer. I recommend backing up your registry BEFORE trying this. Be sure to back up the WHOLE registry, and not just a portion of it when using File>Export. Notice that at the bottom of the save dialog you can choose the Export Range. You should choose All, so you save the whole registry and not just a portion of it…
Using regedit, modify your registry by going to the following location (for SQL Server Management Studio 2012)
HKEY_CURRENT_USER\Software\Microsoft\SQL Server Management Studio\11.0\DataProject
Find and modify the following keys:
• SSVPropViewColumnsSQL70
• SSVPropViewColumnsSQL80
Modify the values of these keys from 1,2,6; to 1,2,6,17; which is effectively just adding 17, which is the value for the table column Description property. You could add probably add other properties as well, as noted below, but I haven’t tried it…
Once you have made the changes, exit Regedit, and restart SQL Server Management Studio. Then you should see the Description column as shown above.
If you wanted to add other columns, you probably could... see the corresponding numbers below...
Property sequence:
1. Column Name
2. Data Type
3. Length
4. Precision
5. Scale
6. Allow Nulls
7. Default Value
8. Identity
9. Identity Seed
10. Identity Increment
11. Row GUID
12. Nullable
13. Condensed Type
14. Not for Replication
15. Formula
16. Collation
17. Description
For older versions of SQL Server Management Studio, see this link…
http://stackoverflow.com/questions/10537610/how-do-i-add-the-description-property-to-the-table-designer-view-in-ssms
Go there >
Tuesday, August 27, 2013
Find Count of Files in a Folder at the Command Prompt
So you want to find a count of the number of files in a directory using the command prompt or a batch file, etc. Here is a really easy way to do it.
Just run the dir command and pipe the results to the find command, using the count parameter:
dir|find /c ".tif"
This will return a count of all the TIF files in your folder. You could replace ".tif" with whatever extension you want, such as ".pdf"
What about a folder with multiple types of files in it? Just add the /b parameter to the dir command to get the bare filenames, and then just look for the single period in the find command, like so:
dir /b|find /c "."
An alternate version that would count all the files in the directory and any sub directories (by adding the /s parameter to the dir command) would be:
dir /b /s|find /c "."
The above won't work if the filenames have other periods in them, like some.name.txt, but for the average filename, this should work just fine.
Lastly, here is the approach that will work with filenames, like some.name.txt, that have multiple periods in them, because it counts the lines, not the periods, in the output:
dir /b /a-d | find /c /v ""
That last one came from Joey:
Go Visit Joey's explanation...
Hope this helps someone out there...
Keywords: batch file, batch script counting files in a folder
Monday, August 12, 2013
SQL Server 2005 Restore Database Error: The operating system returned the error '5(Access is denied.)'
I was trying to restore some old SQL Server 2005 databases to get some data they contained, when I ran into this error:
System.Data.SqlClient.SqlError: The operating system returned the error '5(Access is denied.)' while attempting 'RestoreContainer::ValidateTargetForCreation' on 'C:\Program Files\Microsoft SQL Server\MSSQL.1\MSSQL\test.mdf'. (Microsoft.SqlServer.Smo)
Your error message may look similar, except for the file location on the C drive, or whatever drive you are using.
After some frustration, I figured out the problem. I was actually trying to write my .mdf and .ldf files in a folder where they should not be located. That is why "Access is Denied" and it should be! You should write the files where your other database files are written. (If you need to find where they are, in SQL 2005, set up your Restore Database popup to restore from a currently active database, then go to the Options page on the left, and under "Restore the database files as:" look at "Restore As" which will contain the correct file location.)
In my error case, this location was not where my currently active databases where located, but was set to:
C:\Program Files\Microsoft SQL Server\MSSQL.1\MSSQL\
Your settings may be similar. In my case, this was definitely the wrong location, in fact, the wrong drive!
So to fix my situation, (and hopefully yours), I had to choose a new path and location for my .mdf and .ldf files. This is where the newly restored database files will be stored. (Which should be in the same folder as your other active databases):
Hope this helps you...
System.Data.SqlClient.SqlError: The operating system returned the error '5(Access is denied.)' while attempting 'RestoreContainer::ValidateTargetForCreation' on 'C:\Program Files\Microsoft SQL Server\MSSQL.1\MSSQL\test.mdf'. (Microsoft.SqlServer.Smo)
Your error message may look similar, except for the file location on the C drive, or whatever drive you are using.
After some frustration, I figured out the problem. I was actually trying to write my .mdf and .ldf files in a folder where they should not be located. That is why "Access is Denied" and it should be! You should write the files where your other database files are written. (If you need to find where they are, in SQL 2005, set up your Restore Database popup to restore from a currently active database, then go to the Options page on the left, and under "Restore the database files as:" look at "Restore As" which will contain the correct file location.)
In my error case, this location was not where my currently active databases where located, but was set to:
C:\Program Files\Microsoft SQL Server\MSSQL.1\MSSQL\
Your settings may be similar. In my case, this was definitely the wrong location, in fact, the wrong drive!
So to fix my situation, (and hopefully yours), I had to choose a new path and location for my .mdf and .ldf files. This is where the newly restored database files will be stored. (Which should be in the same folder as your other active databases):
- Starting from the Restore Database popup, look to the left and choose the Options page (in SQL 2005), then look for "Restore the database files as" right in the middle of the page.
- Just look to the right of the Restore As cell (on the Restore Database Options page), and click on the edit box symbol, which will bring up the Locate Database Files popup. Choose the correct path to the directory where you want the .mdf file to be stored, then enter the correct filename. Do the same for the .ldf file.
Hope this helps you...
Subscribe to:
Posts (Atom)